
This article is a general overview of the global features included in MixWave drum libraries.
Drum Library User Interface
General GUI Usage
The Graphic User Interface (GUI) in all MixWave Drum Libraries features an assortment of knobs, switches, sliders, and drag-and-drop functionality*.
Knobs & Sliders
To turn a Knob clockwise or a Slider up, click on the control with your mouse and move the cursor up. To turn the Knob counter-clockwise or a Slider down, click on the control with your mouse and move the cursor down.
To reset a Knob or Slider to its default value, hold down the Command key (macOS) or the Control key (Windows) and click the control.
To fine-adjust a Knob or Slider value, hold down the Shift key (macOS and Windows) while dragging the control with the mouse cursor.
Switches & Buttons
Simply click on a Switch or Button to interact with it. Some Switches or Buttons may have LED indicators to show whether the parameter is engaged or disengaged.
Drag & Drop*
The Groove Player section supports drag-and-drop functionality, allowing you to quickly import MIDI grooves into your DAW. To use this feature, click and hold on a groove within the Groove Player, then drag it directly into a MIDI track in your DAW timeline.
Groove Browser*
To browse included MIDI grooves, use the file browser on the Grooves page. Single-click a folder to view its contents, and double-click a
.midfile to load it into the onboard Groove Player.
*These interface elements are only applicable to the MixWave: Sleep Token - II library.
Drum Library Layout

Kontakt Instrument Header - Global controls that come native with every Kontakt instrument. While a few of its features will be covered in this User Guide, you can learn more about Kontakt and its features in detail by viewing the Kontakt 8 User Guide .
Library Interface - This section will be where the Kit View, Mixers, Settings, and About page controls will be displayed.
Navigation - Each page of the instrument’s user interface consist of different features and options. Navigate through all the different pages of the Kontakt Instrument with these buttons.
Preset Lock - When enabled, this button will lock all the controls throughout the interface. You will still be able to navigate to any page.
Drum Library Global Features
Kontakt Instrument Header
Snapshot View
By default, the Kontakt Instrument Header is displayed with the following controls:

Instrument Icon - Click to collapse or open the library interface.
Instrument Name - Displays the name of the currently loaded Kontakt library.
Snapshot View - Click to display the snapshot controls below the Instrument Name.
Instrument Meter - Shows the output signal level of the Instrument.
Instrument Volume - Controls the output signal level of the Instrument
Info View

MIDI Channel - Shows the MIDI channel that the instrument is currently using. Click to choose any available input MIDI port / channel or select Omni to receive input from any MIDI channel.
Memory - Displayed how much RAM is currently reserved for the instrument. The parameter cannot be edited.
Info View - Click to display the instrument information below the Instrument Name.
Snapshots
Snapshots are essentially presets for the NKI. The following controls allow you to navigate and save Kontakt Snapshots (.NKSN) within the library interface.

Load Snapshot - Allows you to select a Factory or User Snapshot. Loading a snapshot will not reload the current instrument, but set the parameters on the instrument interface. Only after a User Snapshot is saved, you will see the menu update to categorize Factory and User Snapshots.

Snapshot Name - Displays the name of the currently selected Snapshot.
Previous & Next Snapshot - Loads the previous or next Snapshot in the selected category.
Save Snapshot - Allows you to save changes made to the parameters of the instrument as a Snapshot. Clicking this will open a save dialog window where you can enter the name and save the Snapshot.
Delete Snapshot - Delete the currently selected Snapshot. Factory Snapshots cannot be deleted.
Factory Snapshot Locations
macOS & Windows
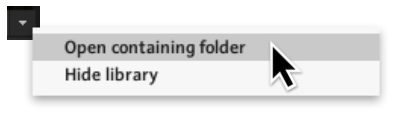
Factory Snapshots are located within the library’s main directory.
Click the arrow next to the library name in the Libraries section of Kontakt and click Open containing folder.
Navigate to …/Snapshots/LIBRARY NAME
User Snapshot Locations
macOS & Windows
User Snapshots can be found through the following directory path:
…/Documents/Native Instruments/User Content/LIBRARY NAME
Kit View
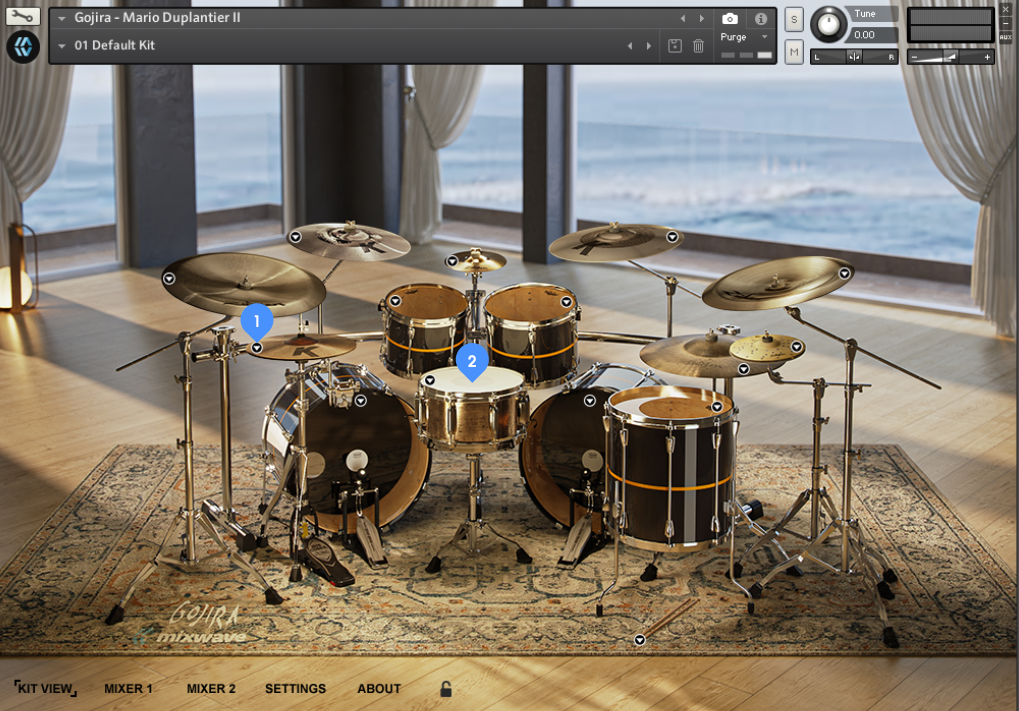
Drum Menus - Use these to load or unload the specific drum from your computer’s memory or select an alternative kit piece option if available.
Trigger on Click - These areas are invisible buttons the overlay the area of every drum head, cymbal, or percussion piece that allow you audition each kit piece when clicking on one of them.
Mixer
Mixer Layout
Mixer Channels - Any Kit piece that was sampled with a close mic will have its own Mixer Channel along with the Overhead and Room Channels. These include volume, panning, solo/mute, phase, and multi-output routing controls. The Master Channel includes controls for master effects, stereo flip, and a master volume.
Mix & Master Panel - This section will either display the Mix Panel or Master Panel controls depending on which Main Channel is selected. The Mix Panel features any additional close mics and hyper-realistic controls for adjusting the room or overhead volume of a particular drum or cymbal individually. The Master Panel includes controls for adjusting the on-board master compressor, EQ, or tape effects.
Reverb Panel - All reverb and effects for MixWave drum libraries are sample-based. The controls in this section allow for individually adjusting the volume, turning on or off, and multi-output routing.
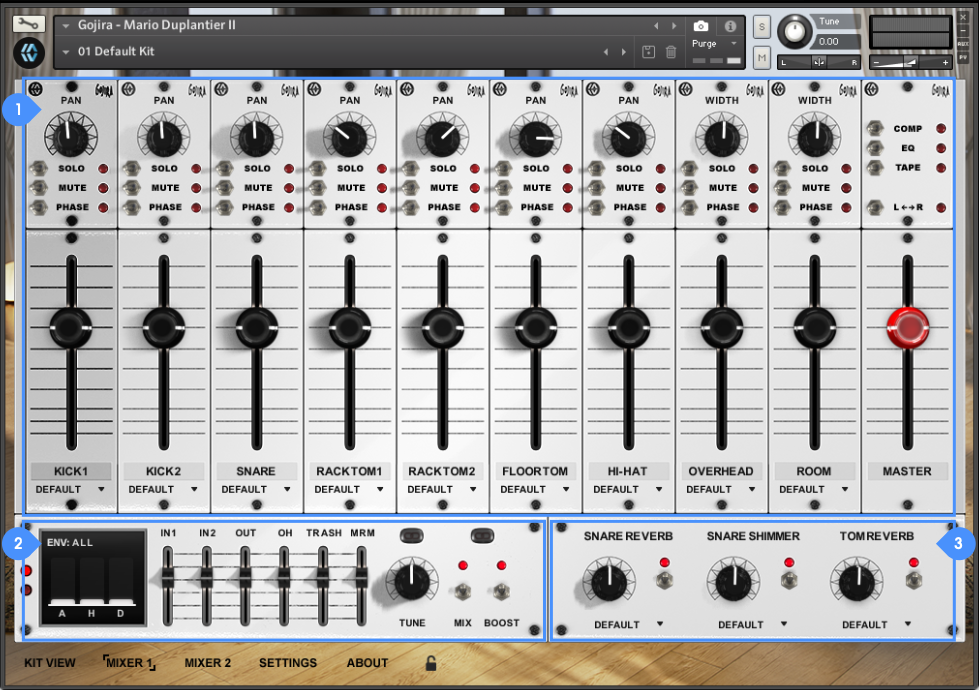
Main Mixer Channels
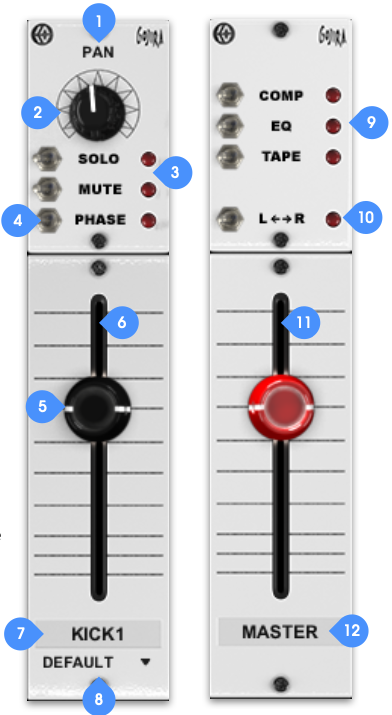
1. Pan and Width Labels - The panning value or width amount will be displayed per channel when adjusting any individual Pan or Width Knob.
2. Pan and Width Knobs - These control the panning of their corresponding drum tracks. Control the stereo width of the Overhead and Room mics. Turned all the way left will make them mono, all the way right will make them pan out to 100% on both sides.
3. Solo and Mute Buttons - These will solo or mute their corresponding drum tracks.
4. Phase Buttons - Flips the phase of its corresponding channel.
5. Volume Sliders - Controls the volume of the channel.
6. Level Meter - Displays the level of the corresponding channel.
7. Channel Labels - Clicking on any of these names shows its Mixer Panel located in the bottom left corner of the Mixer Page interface. The volume dB value will also display here when adjusting any of the volume sliders.
8. Output Menus - Select a Kontakt output for each Main Channel or Reverb to route into multiple tracks in a DAW.
Master Mixer Channel
9. Master Channel Inserts - These toggle the three Master effects ON or OFF. These effects can be adjusted or enabled/disabled in the Master Mix Panel on the bottom left of the Mixer Section.
10. Master Left / Right Swap - Flip the current panning settings across the whole mixer.
11. Master Level Meter - Displays the master level of the Kontakt Instrument.
12. Master Channel Label - Clicking this will show the Master Panel located in the bottom left corner of the Mixer Page interface. The volume dB value will also display here when adjusting the Master Volume Slider.
Mix Panel
The Mix Panel offers controls for envelopes, tuning, mix and boost toggles, and the ability to adjust the volumes and bleed per mixer channel.

Envelope Controls - Adjust the Attack, Hold, and Decay parameters. The AHD settings will affect all mics for the selected channel by default. To affect a single Sub Channel, click the Sub Channel name above the slider (e.g., "IN").
Sub Channel Button - Clicking a Sub Channel name selects which channel will be affected by the Envelope Controls. The name also identifies the Sub Channel.
Sub Channel Volume - Adjusts the volume of the corresponding Sub Channel.
Tune Link Switch - When engaged the Tune knob setting will apply across all Main Channels. When disengaged, the Tune Knob only affects the currently selected channel.
Tune Knob - Adjusts the tuning for the currently selected channel.
Mix & Boost Link Switch - Applies the functions of the Mix and Boost Switches across all Main Channels.
Mix Switch - Toggles between Mixed and Unmixed samples for the currently selected channel.
Boost Switch - Toggles enhancement triggers blended into Kick and Snare close mics, as well as Room mics (depending on the library). The control will appear slightly transparent if Boost is unavailable for a particular channel. Boost can only be used when the Mix Switch is engaged. If the Mix Switch is off, the Boost Switch will also appear slightly transparent.
Master Panel
The Master Panel will include the available onboard compressor, EQ, and tape saturation that can be applied to the instrument master. While the sounds MixWave libraries include completely unprocessed and fully mixed samples, please note that these specific controls are only creative tools to further adjust the default sounds.
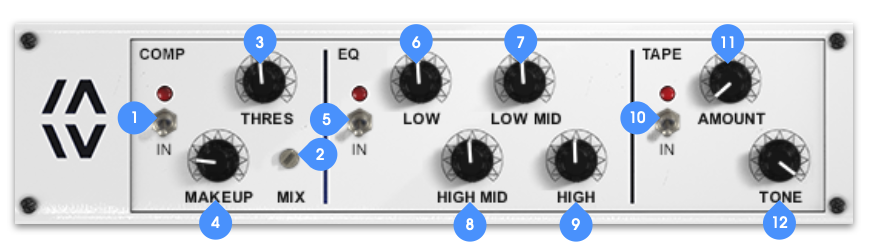
Compressor Bypass Switch - Engages or disengages the master Compressor.
Mix Knob - Blends the levels of the “dry” (clean) and the “wet” (processed) signal from the compressor.
Threshold Knob - Adjusts the level at which compression begins.
Makeup Knob - Adjusts the output gain of the Master Compressor.
EQ Bypass Switch - Engages or disengages the Master EQ.
Low Knob - Boost or cut the Low frequency band of the Master EQ.
Low Mid Knob - Boost or cut the Low Mid frequency band of the Master EQ.
High Mid Knob - Boost or cut the High Mid frequency band of the Master EQ.
High Knob - Boost or cut the High frequency band of the Master EQ.
Tape Bypass Switch - Engages or disengages the Tape effect.
Amount Knob - Adjusts the amount of Tape saturation.
Tone Knob - Adjusts the Tone of the Tape effect.
Reverb Panel
All reverb and effects for MixWave drum libraries are sample-based. The controls in this section allow for individually adjusting the volume, turning on or off, and multi-output routing.
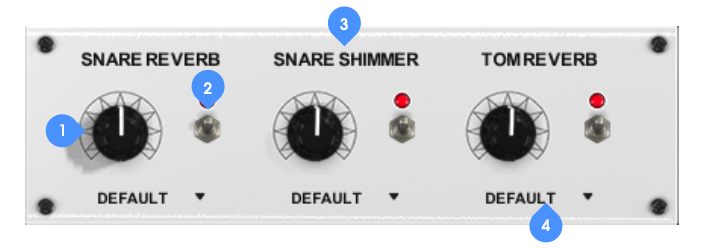
Reverb Volume Knob - Adjusts the level of the reverb effect.
Reverb Bypass Switch - Enables or disables the reverb.
Reverb Name - Shows the name of the reverb. The volume dB value will also display here when adjusting a volume knob below it.
Reverb Multi-Output Menu - Select a Kontakt Output for each reverb to route in a DAW.
Settings
Global Controls
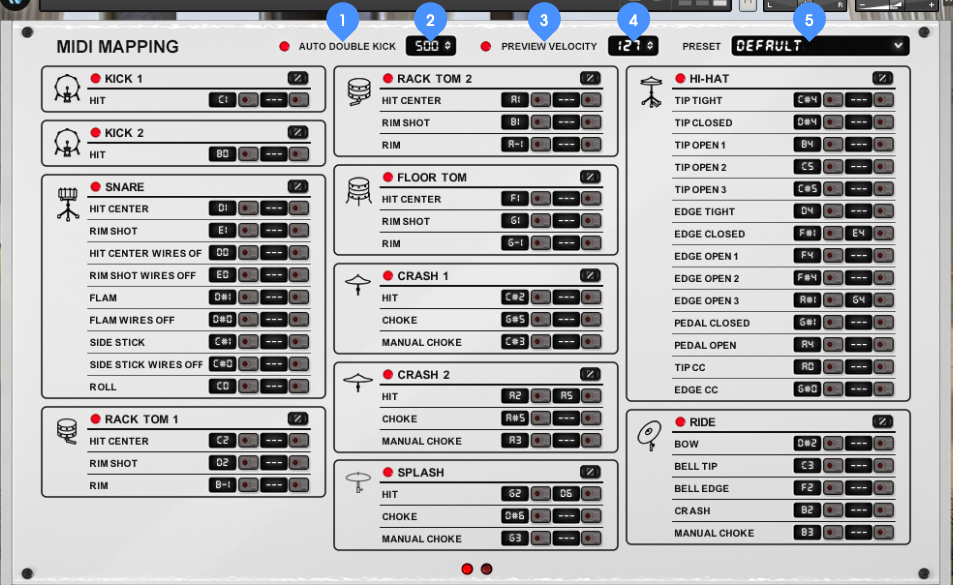
Auto Double Kick Switch - When enabled, triggering the kick will automatically alternate between the two available Kick articulations when notes are played faster than the specified threshold in milliseconds.
Auto Double Kick Threshold - Adjust the threshold in milliseconds for when the ADK will engage.
Preview Velocity Switch - When enabled, audition a sample of each drum/cymbal articulation on the Settings page and each main articulation of the Kit View page.
Preview Velocity - Adjust the velocity strength for the sample audition playback on the Settings or Kit View page.
Mapping Preset Menu - Choose between different Mapping Presets, create custom mapping presets, import/export mapping presets, or clear the map to edit the mapping from scratch.
MIDI Mapping Presets
Located under the Preset drop-down menu at the top right of the Settings section, these controls allow you to navigate through the Factory MIDI Presets, save, export, and load Mapping Presets within library interface.
Learn more about saving, loading, and exporting MIDI Mapping presets in the MIDI Mapping Presets Guide
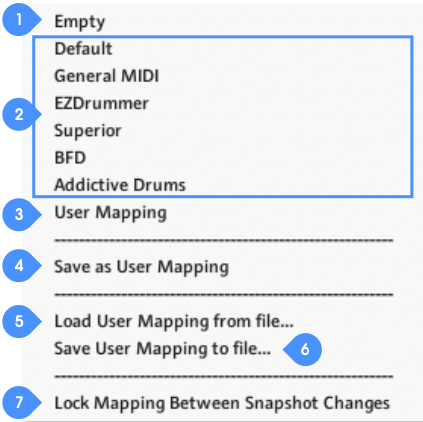
Clear MIDI Map - Select “Empty” in the MIDI Mapping Preset Menu the clear all MIDI Mapping data.
Factory MIDI Presets - These presets are intended to be a quick start when using MIDI created with another drum software by those names. Please note that the drums and articulations sampled in a MixWave library might not completely match with one of those drum softwares which may need some modifications to the mapping in order to account for every Kit Piece.
User Mapping - This option within the MIDI Mapping Presets is a reserved slot for when a custom User Mapping is saved.
Save as User Mapping - Saves the current MIDI Mapping configuration to the “User Mapping” slot.
Load User Mapping from file… - Allows you to locate a Mapping Preset file (.NKA) and load the MIDI Mapping.
Save User Mapping to file… - Click to export the User Mapping.
Lock Mapping Between Snapshot Changes - When active, the MIDI Mapping will not change when browsing through the instrument Snapshots and a “*” will be displayed.
MIDI Mapping
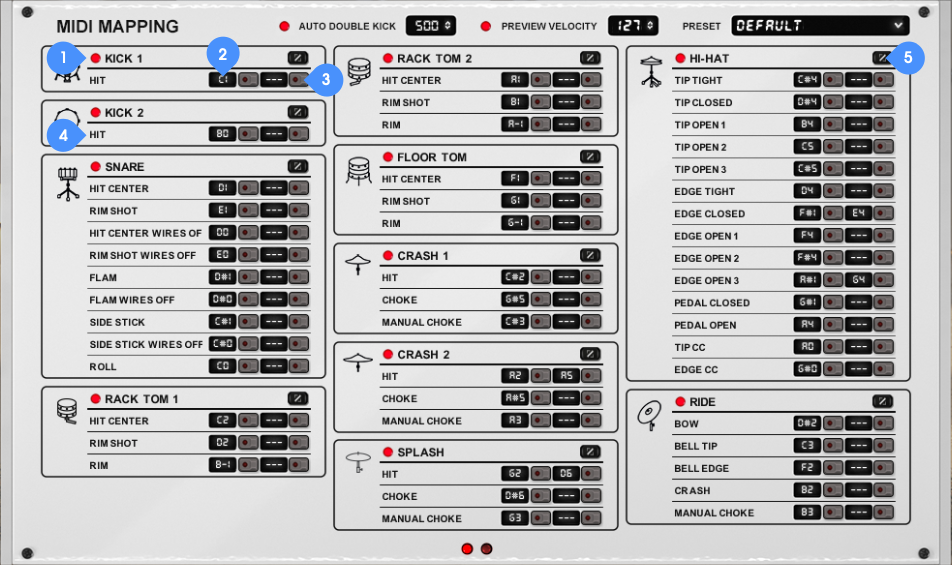
Kit Piece Purge - When disabled, that particular Kit Piece will be unloaded from your computer’s memory. Enable to load the Kit Piece back into memory. The states of these will also reflect on the Kit View page.
Primary & Secondary Map Keys - Displays the note that each instrument is currently mapped to. These can be used to change the MIDI mapping by either click and dragging the mouse cursor up or down, or utilizing the MIDI Learn buttons. The note name will display as a different color to signal that the note is already mapped to another articulation. Secondary mapping is available in the case that you would like to map the same drum to two different notes. (Ex: On an E-Kit you could map the snare rim and snare center both to the snare drum.)
Primary & Secondary MIDI Learn - When enabled, the control's LED will start blinking. Use your MIDI keyboard/controller or the on screen Kontakt keyboard to map the articulation to the desired note. If you are mapping to a note that is already assigned, this will override and clear the previously mapped articulation.
Articulation Name - Click any articulation name to audition a sample of that particular articulation.
Velocity Curve Editor - When clicked, this will reveal a pop-up window of additional controls to adjust the velocity curve per Kit Piece.
For a more in depth guide on how to use the MIDI Mapping section, view the MIDI Mapping Guide.
Velocity Curve & Hi-Hat Control

Kit Piece Curve Editor Select - Shows the currently selected Kit Piece for the below Velocity Curve controls. Selecting the Hi-hat will bring up additional Hi-hat CC controls.
Exit Button - Closes out of the pop-up window. You can also close the pop-up window by clicking anywhere in the darkened area around the pop-up window.
Velocity Curve - Adjust the velocity curve for the currently selected Kit Piece by dragging up (increases sensitivity) or down (decreases sensitivity). Holding Alt/Option while dragging up or down will set the Velocity Curve for all Kit Pieces.
Hi-Hat MIDI Controller Curve - Adjust the value scaling curve of the Hi-hat CC by dragging up (increases sensitivity) or down (decreases sensitivity).
Hi-Hat CC Number - Selects the MIDI Controller that will be used to control the Hi-Hat CC articulation(s) manually from MIDI CC 0 to 127 or Channel AfterTouch.
Invert Button - Changes the direction of the MIDI CC. This may need to be enabled depending on certain electronic drum kits or MIDI CC controllers.
Learn Button - Learns the MIDI CC that will be used to control the trigger articulation.
Position - Shows value of the Hi-Hat MIDI CC. Manually set the Hi-hat MIDI CC by clicking dragging the control to the left or right.