How can we help?

Plugin User Guides
Guitar Input Level Calibration Guide
An overview on calibrating your guitar or bass input level with MixWave amp plugins.
Updated 3 weeks ago
This guide will walk you through the steps to properly calibrate the input levels of your interface with MixWave amp plugins.
Prepare Your Track and Plugin Setup
Create a new audio track in your DAW and lower the volume fader or your monitoring level.
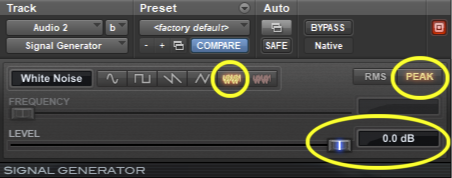
Insert a signal generator plugin on the track and configure it to produce white noise, ensuring a full-frequency range at 0 dB. Caution: This signal is very loud.
View The Target Input Level
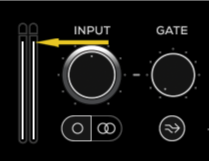
Place a MixWave amp plugin as an insert after the signal generator.
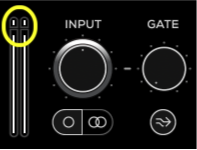
Start the signal generator. Verify that the input level meter on the MixWave amp plugin matches the reference level shown in the provided image. This is your target calibration point.
Disable or bypass the signal generator.
Connect Your Instrument
Plug your bass or guitar into your audio interface. Enable record arm or input monitoring on the track to hear your instrument processed through the amp plugin.
Adjust the input level on your interface to your preferred recording level:
You can set your preamp to 0 dB, use a lower setting (e.g., -20 dBFS), or increase it to a hot level where the peak transients nearly reach 0 dBFS without clipping.
For interfaces like the UA Apollo with Unison or similar plugins, adjust the Input and Output parameters on the plugin for fine control.
Optimize Input Levels for Your Performance
While playing your instrument, ensure your strumming or plucking reflects the loudest points of your performance.
Adjust the input level on your audio interface or the plugin's Input Knob so that the peaks align with the recommended calibration target (Section #2). Setting the level on your interface is recommended for consistency when browsing through plugin presets.
If you prefer a more dynamic signal, you can set the input level higher until the peak indicator on the plugin's Input Meter lights up. Avoid clipping at all stages.
Consider Instrument-Specific Adjustments
Low-output pickups, such as single-coils or vintage humbuckers, may produce lower input levels and require higher preamp gain.
High-gain active pickups might need additional steps to manage input levels:
Lower the guitar’s volume knob.
Connect to the interface's Line Input instead of the Instrument Input.
Use a DI box if necessary.
These steps ensure an optimized input signal for accurate performance through MixWave amp plugins, tailored to your instrument and playing style.